Why You’ll Love Hiking Laguna Esmeralda
If you are looking for that one “must-do” trek while visiting the End of the World, Laguna Esmeralda is likely at the top of your list. It’s one of the most famous highlights near Ushuaia, and for good reason. It offers a rewarding experience that you can easily fit into a single day without needing heavy camping gear or an overnight stay.
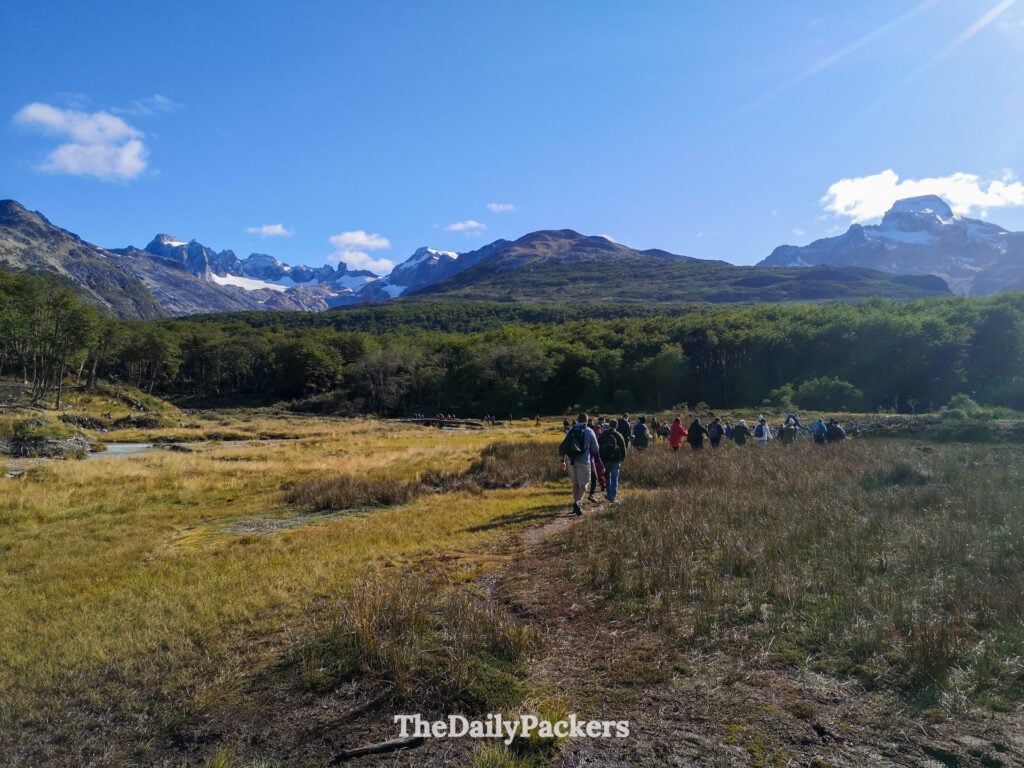
We’ve spent a lot of time trekking through Argentina and South America, from the spiritual vibes of Capilla del Monte to the jagged peaks of El Chalten. We’ve even wandered through Aconcagua Provincial Park and explored various corners of Tierra del Fuego. But we have to be honest: Laguna Esmeralda was the most crowded trail we encountered in all of Patagonia. That doesn’t mean you should skip it, but it’s good to know what to expect!
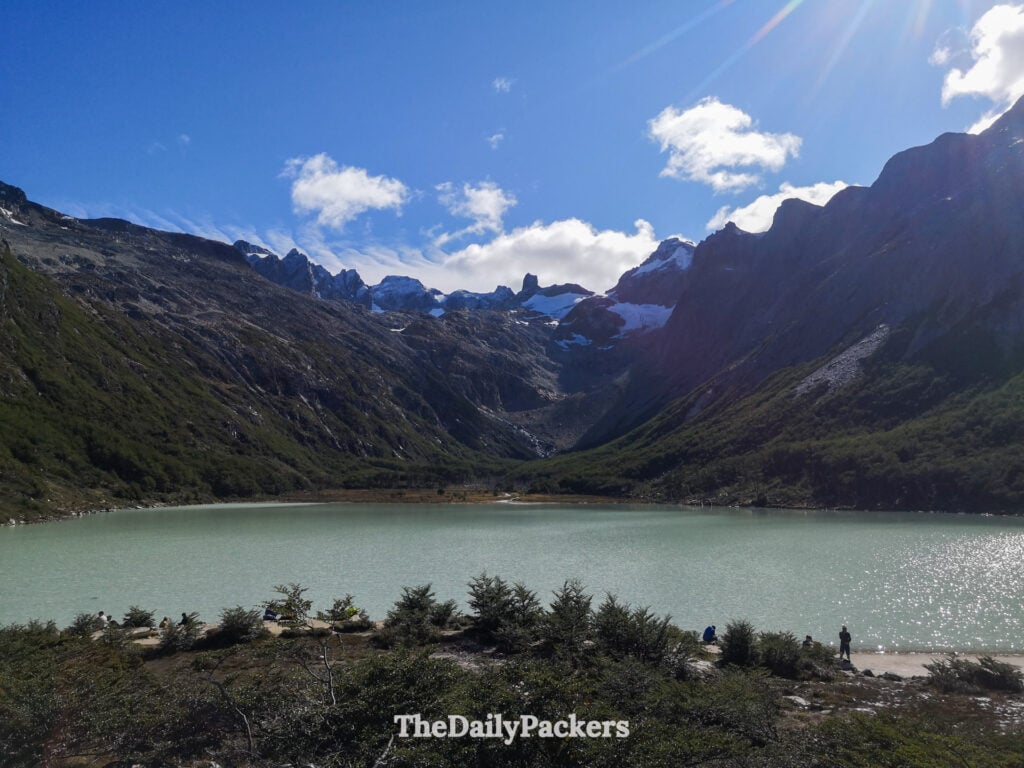
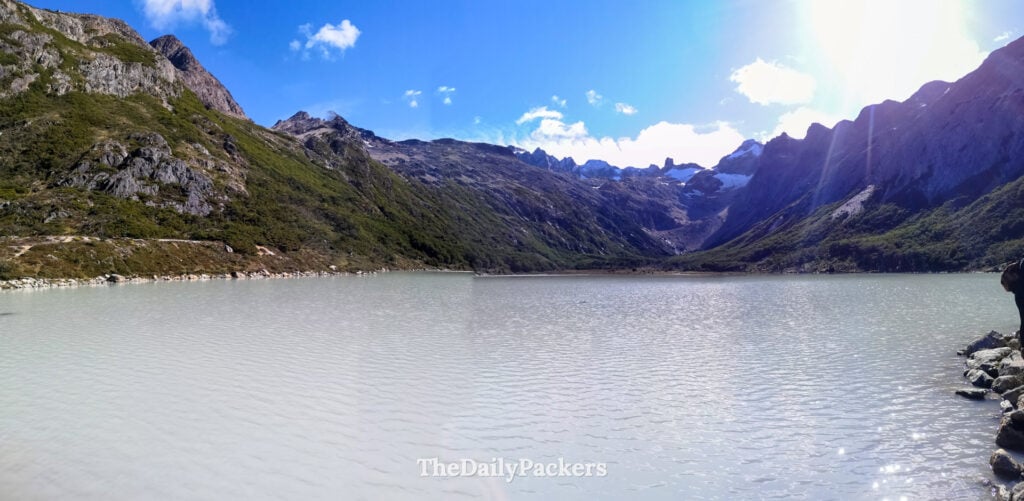
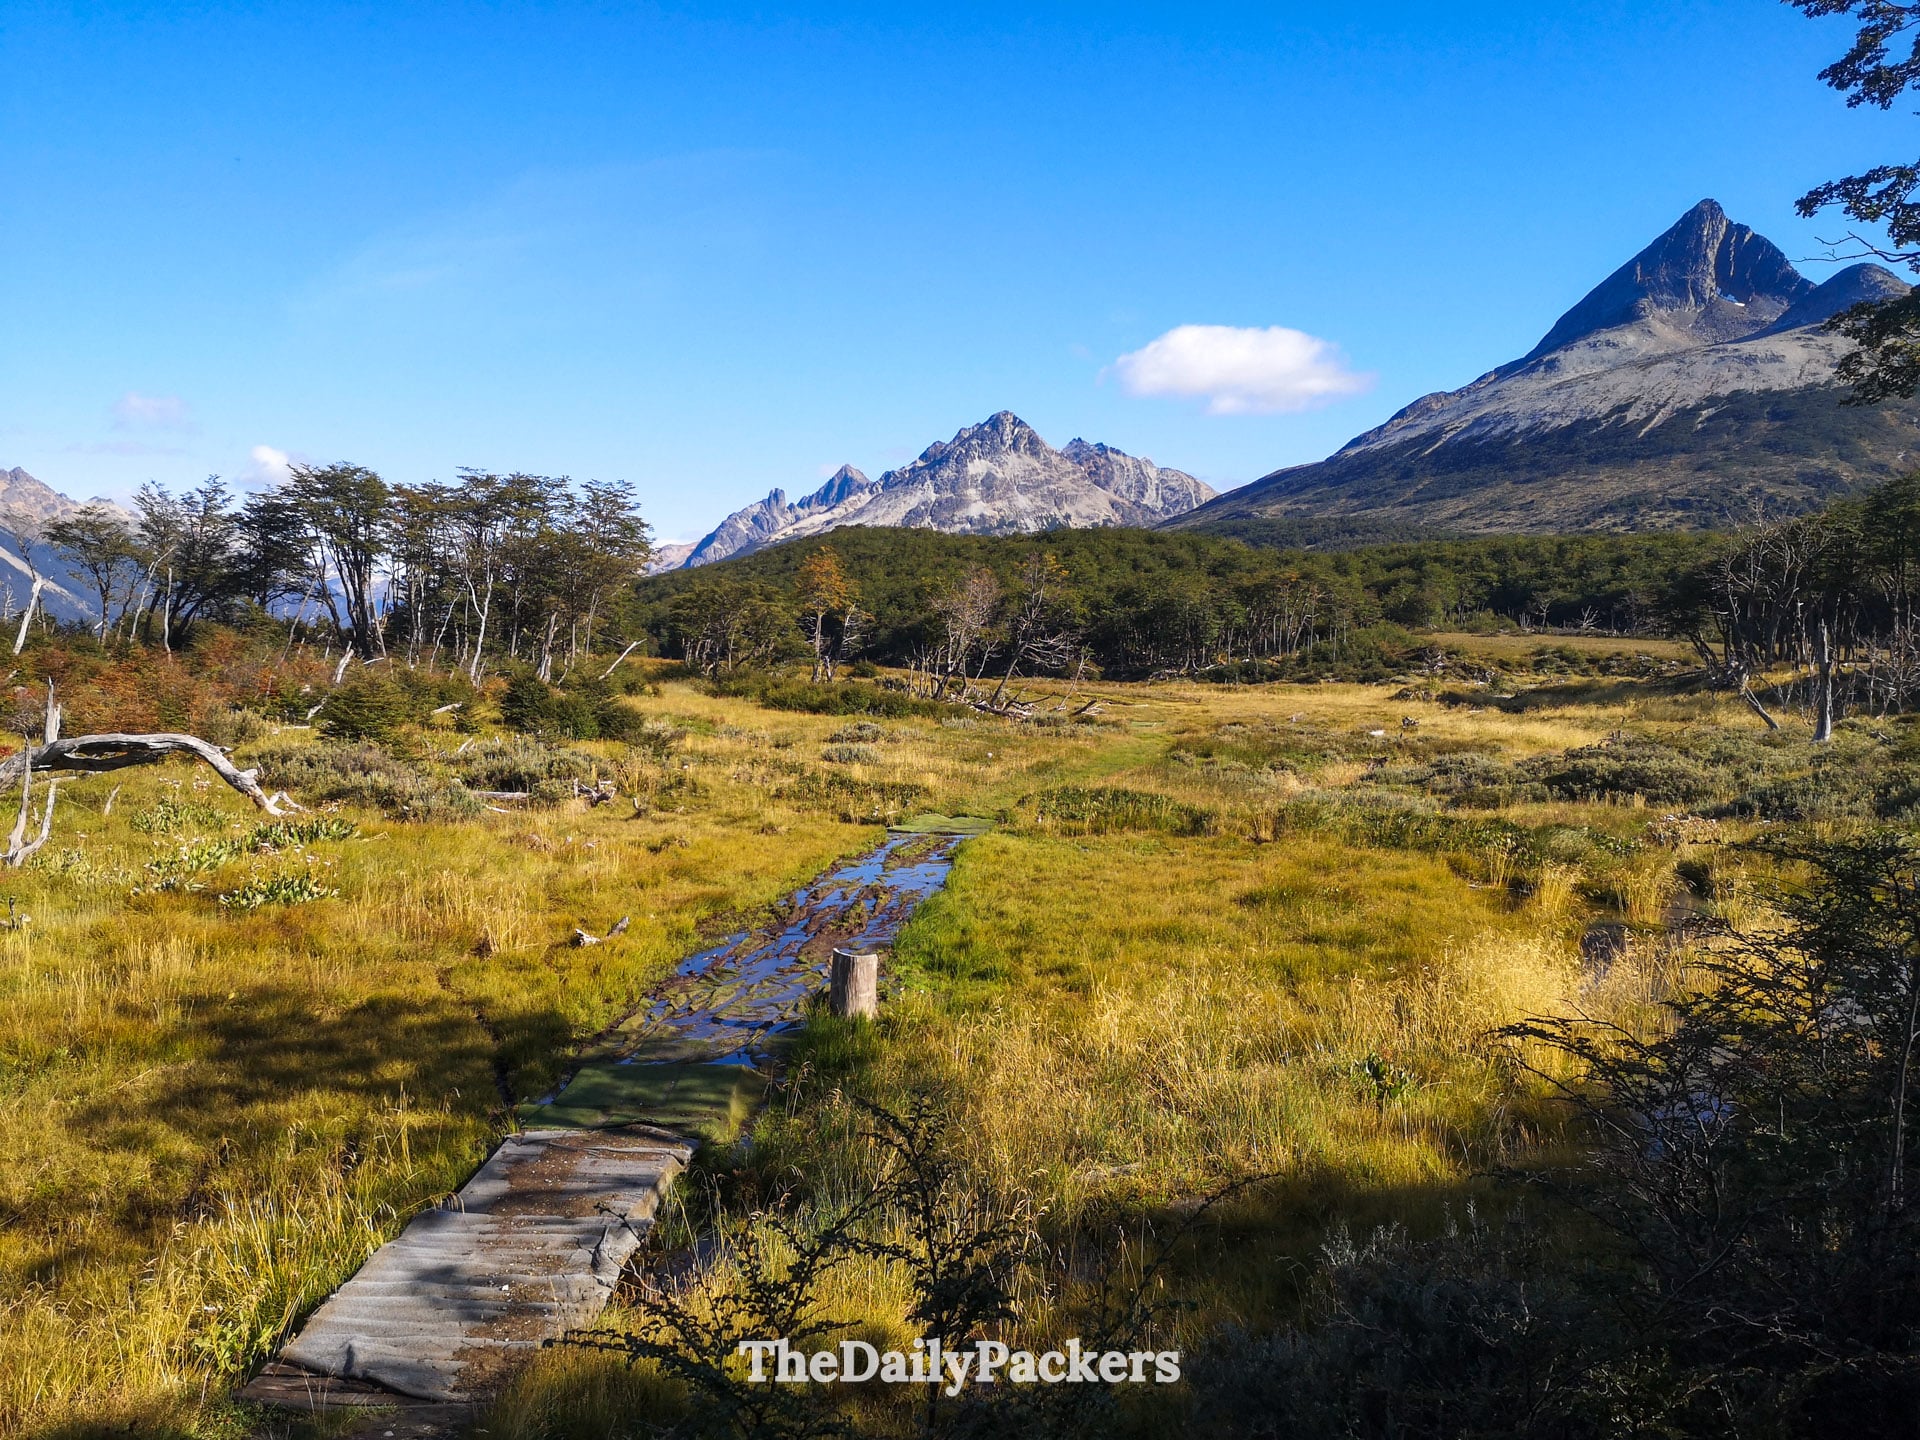
The hike is a 9.7 km round trip with a very gentle 204-meter incline. This makes it accessible for most fitness levels. You’ll wind through thick forests and open peat bogs before reaching the prize: the mesmerizing turquoise waters of the Emerald Lagoon, tucked away beneath dramatic glacial peaks.
You can choose to tackle this trail on your own (which is quite straightforward) or join this highly rated tour, if you prefer having a guide to explain the local geology and flora.


Choosing Your Trail
For Laguna Esmeralda, there aren’t dozens of different routes; it’s a very straightforward out-and-back trail. However, you do have a couple of options depending on how much of a challenge you want:
- The Standard Path: This is the 9.7 km round trip that most people do. It’s well-marked and takes you through the valley, across the peat bogs, and through the forest. It’s relatively flat, making it the go-to for a relaxed day.
- The Glaciar Ojo del Albino Extension: If you reach the lagoon and feel like you haven’t had enough, you can technically continue up to the glacier that feeds it. Warning: This is a much more technical, steep, and demanding climb. It requires a much higher fitness level and, ideally, a mountain guide, as the terrain becomes rocky and the trail is less defined. For a standard day trip, we recommend sticking to the Laguna Esmeralda path.

How to Hike Laguna Esmeralda
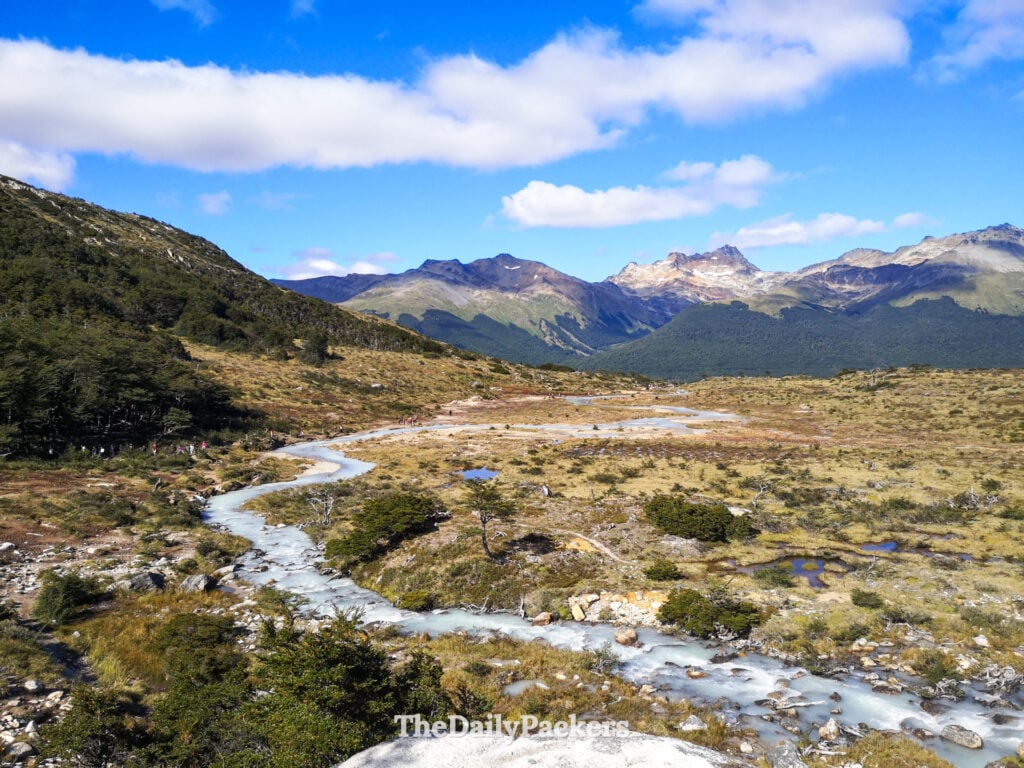
The adventure begins just off Ruta 3, at a clearly marked trailhead about 20 minutes outside of town. You’ll kick things off by crossing a small wooden bridge over the Lasifashaj River, and almost immediately, enter a thick Lenga forest.
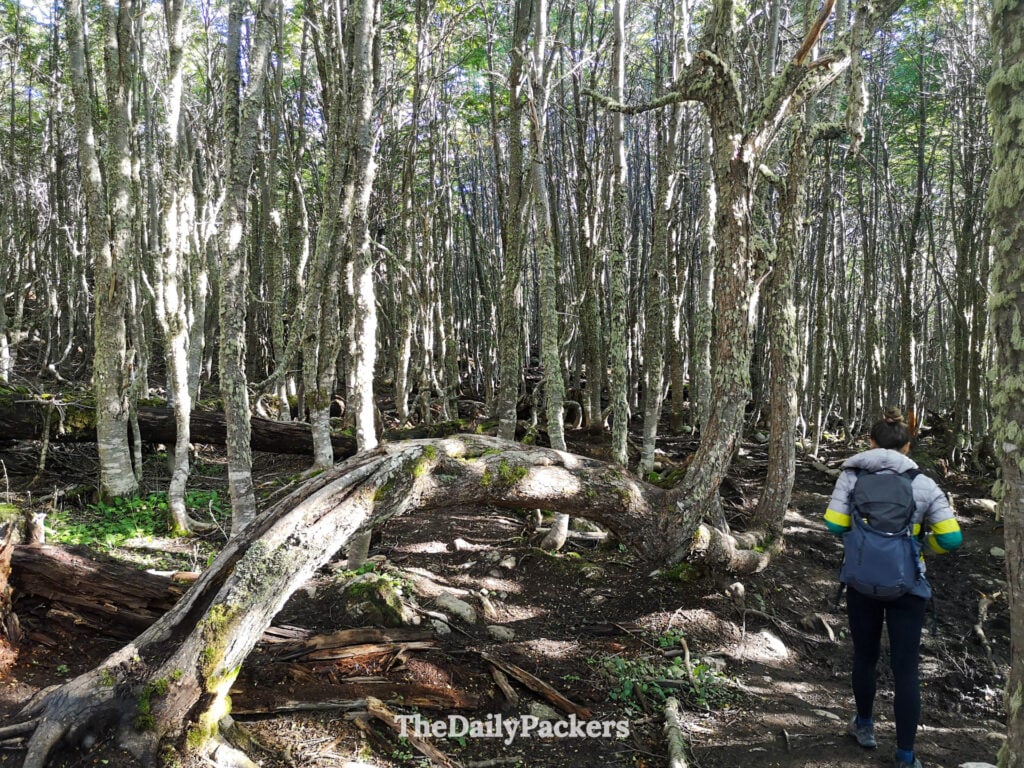
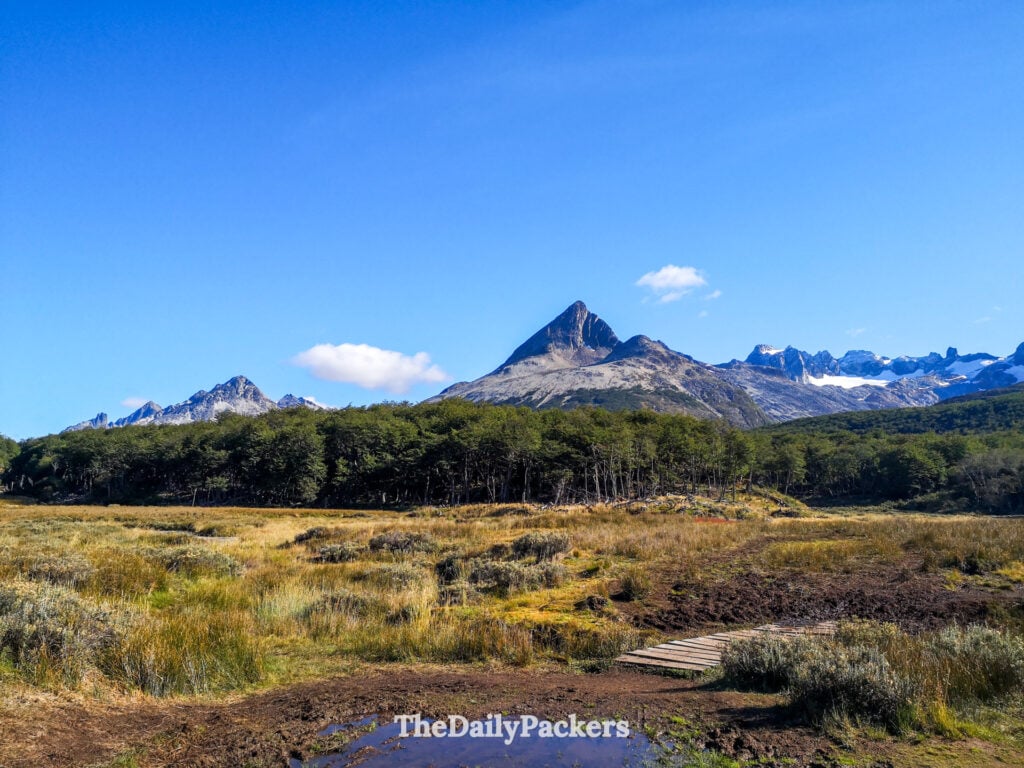
As you walk, the dense canopy eventually gives way to wide, open peat bogs (known locally as turberas). These are essentially giant, mossy sponges that dominate the landscape. This is where the real “Patagonian experience” begins!
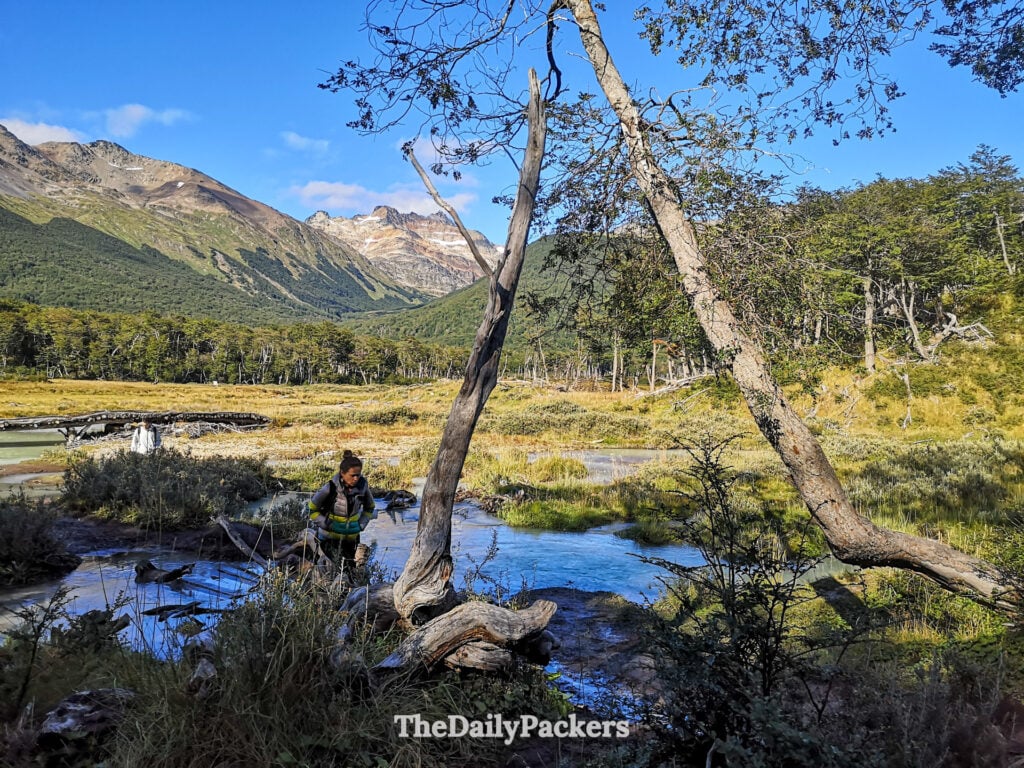
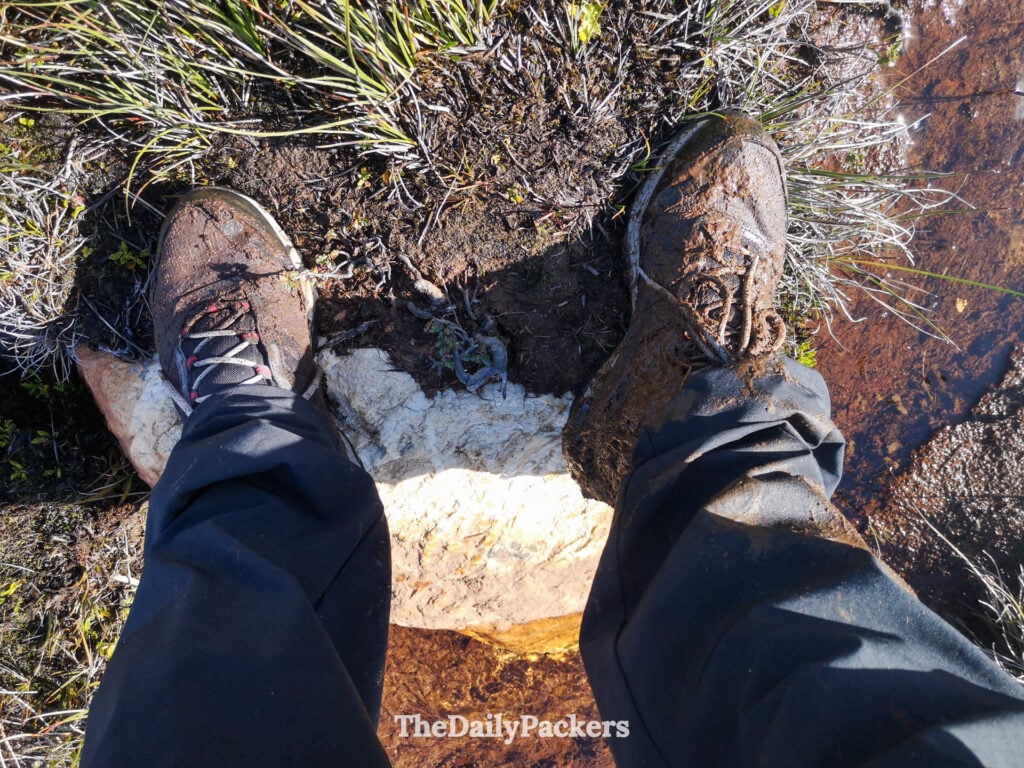
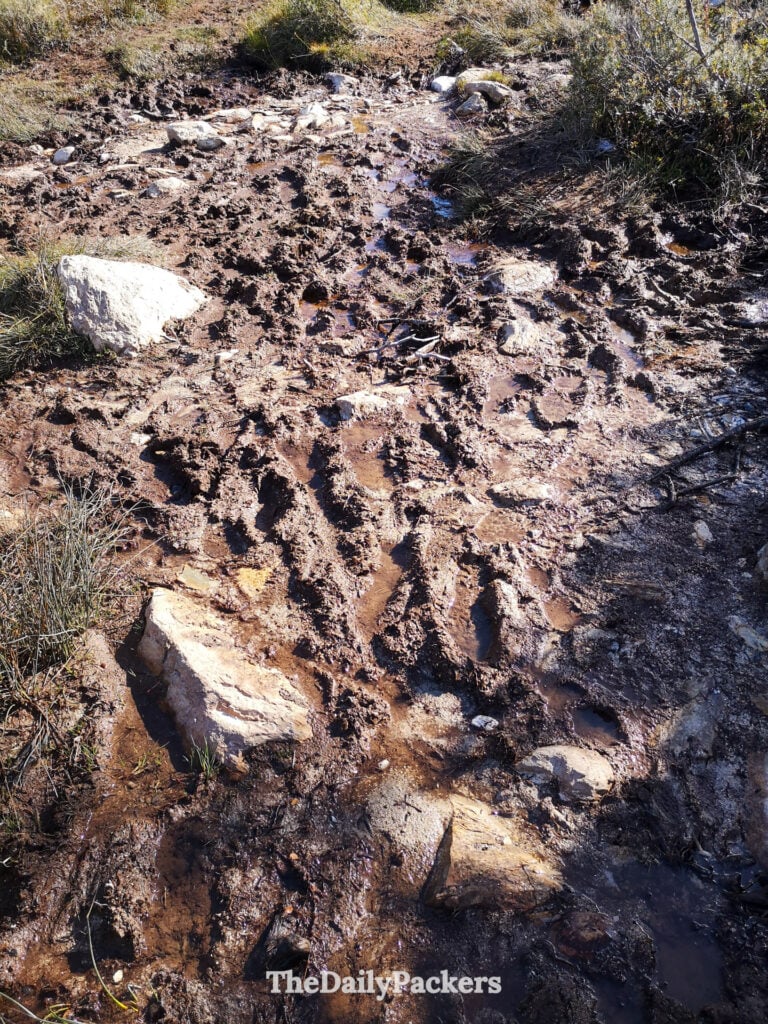
We found that after even a little bit of rain, the path turns into a series of deep mud pools. You’ll see the trail start to widen significantly here as everyone tries to find a dry patch of grass to step on.
Our best advice? Don’t fight the mud too hard—you’re likely going to get some on your boots anyway! We spent a good portion of the hike hopping from one tuft of grass to another, but there were still moments where we found ourselves sinking deeper than expected. It’s all part of the fun, as long as you have waterproof shoes.

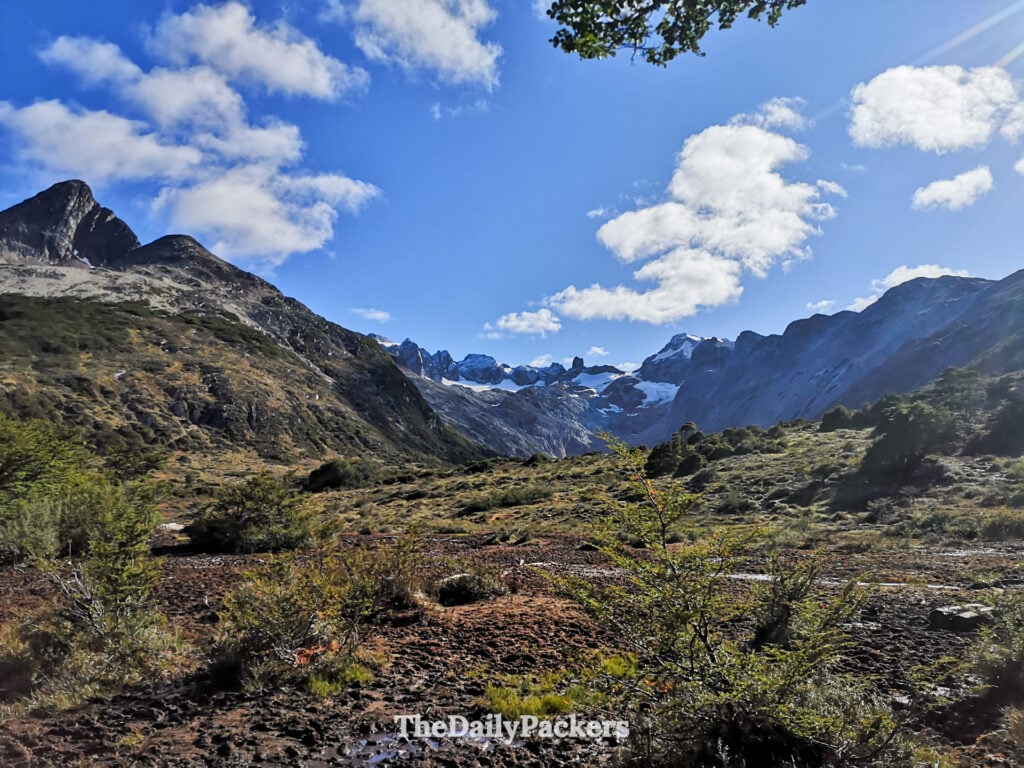
The final stretch takes you back into a lighter patch of forest before the trees suddenly part to reveal Laguna Esmeralda.

It’s a real “wow” moment. If the main shore feels crowded when you arrive (which happens often when the tour buses pull in), don’t just stop at the first clearing. We highly recommend walking a bit further around the water’s edge to the right. Just five or ten minutes of extra effort gave us a much quieter spot to sit, open our backpacks, and enjoy the view of the hanging glacier in peace.
One of the things that makes this hike special is the social atmosphere. While we were resting at the lagoon, we met a traveler from Canada who asked us to take a photo. What started as a quick favor turned into a deep conversation that lasted the entire hike back! He was just starting a long journey after leaving Asia, looking for a fresh start away from travel restrictions.
The return journey follows the exact same path. Keep an eye on your surroundings as you head back through the woods; we actually managed to lose the markers for a second near the end because we were so caught up in chatting! By the time we reached the shuttle area, our group had grown even more.
We ended up sharing the ride back with our Canadian friend and a teacher from Buenos Aires who was traveling with her mother. By the end of the trip, the van was a lively mix of Spanish, English, and Chinese. It’s these spontaneous encounters that really turn a simple hike into a great memory.
How to Get to the Trialhead
Reaching the Laguna Esmeralda trailhead from Ushuaia is quite straightforward, and you have a few different options depending on how much you want to spend and how much flexibility you need.
Shuttle Bus – The Most Popular Choice: This is how we chose to get there. You can find shuttles at the small station located right opposite the main bus terminal in town. Several local companies run this route daily. Usually, a round-trip ticket costs around 600 pesos per person, but here’s a tip: we mentioned we’d used the service for Tierra del Fuego the day before and managed to get a discount, paying 500 pesos instead (Expect to pay between 8 and 10 USD). The shuttles generally leave in the morning (around 9 or 10 AM) and have set return times in the afternoon.

Rental Car – Best for Total Freedom: If you want to arrive before the crowds or stay late for the golden hour, renting a car is your best bet. The drive is easy and takes about 20–25 minutes. Most of the way is on the paved Ruta 3, with only a short, well-maintained gravel section at the very end leading to the parking lot.
Taxi or Private Transfer – Comfort at a Price: If you missed the shuttle or just prefer a private ride, you can grab a taxi. It’s the most comfortable way to go, but it will cost you significantly more—usually between $30 and $50 USD for a one-way trip. If you go this route, make sure to arrange a pickup time for the return, as there’s no cell service at the trailhead to call one later!
Hitchhiking – For the Budget Adventurer: We saw a few people trying their luck along Ruta 3. While hitchhiking is quite common and generally safe in Patagonia, it’s not always reliable. You might get a ride in five minutes, or you might be waiting an hour in the wind. If you try this, start early in the morning when the flow of hikers leaving town is highest.
Organised tour: If you want the most comfort and do not have to worry about the trail itself. You can take a fully organised Emerald Lagoon Trekking Tour.
The Best Time to Visit: Weather & Seasons
Ushuaia’s weather is famous for giving you “four seasons in one day,” so you should always be prepared for anything. However, the landscape of the lagoon changes drastically throughout the year:
Spring (September – November): This is a beautiful time to watch the valley wake up. Temperatures hover between 0°C and 10°C (32°F – 50°F). You’ll see the last of the snow melting and the first wildflowers peeking through. Just be ready for a lot of mud on the trail as the snow thaws!
Summer (December – March): This is the peak season for a reason. With long daylight hours and temperatures between 5°C and 15°C (41°F – 59°F), it’s the most comfortable time to hike. The water is a bright, clear turquoise, but this is also when the trail is the most crowded.
Autumn (April – May): If you ask us, this might be the most photogenic season. The Lenga forests turn brilliant shades of red and orange. Temperatures are cooler, around 0°C to 10°C (32°F – 50°F), and the crowds start to thin out.
Winter (June – August): The lagoon transforms into a frozen white sheet. Temperatures stay between -5°C and 5°C (23°F – 41°F). You’ll likely need crampons or snowshoes to navigate the icy path, but seeing the “Emerald” lagoon completely white is a magical experience.
Psst, you can join Tina’s Yoga Studio and get access to hundreds of Yoga, Meditation, and Well-being videos.
Where to Base Yourself: Our Favorite Neighborhoods
Choosing the right place to stay in Ushuaia makes a huge difference, especially since you’ll want to be close to the shuttle hub for your trek. Here are our favorite neighborhoods and some specific spots we recommend for your base at the “End of the World”:
Downtown (Centro): Best for Convenience: If you want to be in the heart of everything, this is the place to be. You’ll be within walking distance of the main restaurants, outdoor gear shops, and the shuttle station for Laguna Esmeralda. It’s perfect if you don’t have a rental car.
Alto Andino Hotel: This is a fantastic mid-range option right in the center. What makes it special is the top-floor breakfast room—it has massive windows with one of the best views of the Beagle Channel and the city.

The Beagle Channel Waterfront: Staying slightly along the coast gives you a bit more peace while keeping you close to the harbor and the main shuttle points.
Hosteria y Restaurante America: This is a great choice if you’re looking for a cozy, more traditional feel. It’s located just a short walk from the center, giving you a bit of quiet without being isolated. Plus, having a reliable restaurant on-site is a huge bonus after a long day of hiking when you’re too tired to go searching for food!

The Eastern Hills: If your budget allows for a bit of a splurge and you want to feel tucked away in the Patagonian wilderness, head up into the hills. You’ll need to rely on taxis or the hotel’s own shuttles to get to the trailhead, but the views are unbeatable.
Arakur Ushuaia Resort & Spa: This is the ultimate “treat yourself” stay. It’s perched high above the city within the Cerro Alarkén Natural Reserve. The infinity pools overlooking the channel are legendary. It feels completely secluded and high-end, making it a great place to relax those sore muscles after you finish the trek.

Essential Hiking Gear & Tips
Even though the hike is considered “moderate,” the Patagonian elements are no joke. Here is what we suggest you pack to make sure you actually enjoy the day:
- Waterproof Hiking Boots: This is non-negotiable! As we mentioned, the peat bogs are basically giant sponges. If you wear regular sneakers, you will have wet feet within the first hour.
- Layers, Layers, Layers: We always use the “onion” system. Start with a thermal base, add a fleece or wool mid-layer, and finish with a windproof and waterproof shell. The wind coming off the glacier at the lagoon can be biting, even on a sunny day.
- Trekking Poles: These are a lifesaver in the muddy sections. They help you balance on slippery logs and test the depth of the mud before you commit to a step.
- Sun Protection: Don’t let the cold fool you. The southern sun is strong, and the glare off the water (or snow in winter) can be intense. Bring sunglasses and sunscreen.
- A Refillable Water Bottle: The water in the streams is often clean enough to drink, but we recommend bringing a bottle you can fill up before you leave town. Staying hydrated is key, even when it’s chilly.
What No One Tells You
While every guide will tell you how beautiful the water is, there are a few things you usually only find out once you’re actually standing on the trail.
First, the mud is not just “a little bit of dirt.” It is a deep, sticky, clay-like peat that can genuinely swallow a shoe if you aren’t careful. We saw several hikers in brand-new white sneakers looking absolutely devastated within the first twenty minutes. Don’t be that person!
Second, because it’s a “valley hike,” people assume it’s always easier than the mountain climbs. But the terrain is uneven and can be quite tiring on your ankles because you’re constantly navigating roots and slippery rocks.
Lastly, the “crowd factor” is real. Since it’s the most accessible hike in Ushuaia, you’ll be sharing the trail with large tour groups. If you want a shred of solitude, you really have to time your visit. We suggest either being on the very first shuttle of the morning or waiting until the early afternoon when the morning groups are already heading back to town.

What it Costs: Budgeting for Your Day
Hiking to Laguna Esmeralda is one of the more budget-friendly things to do in Ushuaia, especially since there is currently no entrance fee for the trail itself (unlike Tierra del Fuego National Park).
Here is a quick breakdown of what you can expect to spend:
- Transport (Shuttle): Around 8 USD for a round trip. (Try to ask for a “frequent flyer” discount if you’ve used the same company before—it worked for us!).
- Food: $5–$10 USD for a packed lunch and snacks from a local “rotisería” or supermarket in town.
- Gear Rental: If you need to rent walking poles or waterproof boots in town, expect to pay around $5–$10 USD per day.
Total estimated to hike Laguna Esmeralda cost for a solo hiker using the shuttle: Roughly $15–$20 USD. It’s probably the best value-for-money day you’ll spend in Patagonia!
About the authors
We are Alex and Tina, a French-Serbian couple who met in China back in 2014. We spent three incredible years there before making France our home. Our shared passion for travel has been the heartbeat of our relationship for over 12 years, taking us across 44 countries and counting.
We launched TheDailyPackers in 2019 as a way to document our adventures. In 2026, we reached a major milestone by officially turning our blog into our full-time job. While we are still growing toward financial independence through this platform, every article we write is fueled by our mission to make your voyages easier through in-depth guides, honest advice, and the lessons we’ve learned from our own mistakes.
Our journey has not been without its storms. In 2023, our world changed forever when our first son, Poppy, was stillborn on November 25th. It was, and remains, the hardest chapter of our lives. In 2025, we were blessed with our second little boy, Milo. He has since joined our traveling tribe, and you’ll be seeing him—and the reality of traveling with a little one-on the blog more and more.
We hope to inspire you to explore the world with curiosity and resilience. Thank you for being part of our story.
You may also like those related posts
25 best things to do in Jerusalem, Israel, in 3 to 5 days
Unique Guesthouse Montevideo: In memory of dear Mario 2020
Lavezzi islands: Corsica’s best secluded island in 2025
18 Best Things to do in Lisbon, Portugal, in 3 to 4 days
TMB Stage 11: Guide from La Flégère to Les Houches
5 Best Things to do in Remedios, Cuba, in 1 single day
São Paulo to Curitiba: The Ultimate 6h Bus Guide
Seville Itinerary: Our Perfect 5 Days in Seville, Spain
Pssst, did you know that…
If you purchase something through our links, we earn a small fee. However, you still pay the same. Win-win! And one day we may get to be full-time travel bloggers =)
Find Hotels with Booking.com
Do Yoga with KVY
Buy us a Coffee
Rent a car with DiscoverCars
Find Attractions with GetYourGuide
Find Flights with Expedia
Buy an eSIM with Airalo
Get insured with World Nomads
Get ready with Amazon.com