
Introduction
Starting a blog isn’t necessarily about launching a business — it can simply be about sharing your ideas, passions, or experiences with others. We decided to start a blog back in 2019, when we first travelled to South America, driven by the same curiosity that made us read countless blogs before trying something new. Whether it was researching travel inspiration, learning new skills, or exploring personal growth, we always turned to blogs for insights and advice. Eventually, we thought — why not do the same for others?
That’s how The Daily Packers began: a place to share what we’ve learned, hoping it could inspire or help others along the way.
At first, we both worked full-time and started the blog as a side project. However, when 2020 arrived, we suddenly had the time to focus and improve it. Even then, we didn’t expect to earn money from it. For the first year, it was simply a passion project — we added a few affiliate links and ads later, but our main goal was still to create something meaningful and useful.
And honestly, if I (Alex) could do it, anyone can. I’m an automotive engineer and salesman by trade, not a writer, designer, or marketing expert. I knew nothing about blogging, SEO, or web design when we started — and I still make plenty of spelling mistakes along the way!
The truth is, starting a blog today is easier than ever. You don’t need a big budget or technical background — just a story to tell and the motivation to share it. If you’ve ever wondered how to start a blog or even just how to have a blog that reflects who you are, this step-by-step guide will walk you through everything you need to get started.
Tip: Invest where it matters most — your hosting, domain, and design. These are the foundations of your blog’s performance and reliability. Everything else can be added step by step as you develop your content and brand.
How to start a blog Step 1: Define Your Audience
The first step to start a blog successfully is to understand who you’re writing for. Whether you’re creating a blog about lifestyle, finance, wellness, or creativity, knowing your audience will help you focus your content and grow faster.
When we first started our own blog, we honestly skipped this part. We didn’t think about readers or strategy — we just wanted to share what we loved. And that’s totally fine if your goal is simply to express yourself and see where it goes. But if you want to build something long-term, take a moment to think about who you’re talking to.
Before starting a blog, ask yourself:
- What kind of topics will I write about?
- Who would benefit most from reading my posts?
- What problem or need can I help solve?
If you start a blog about personal development, are you writing for students, professionals, or parents? If it’s a food blog, will it focus on quick weeknight meals, baking, or plant-based recipes? The clearer your target audience, the easier it’ll be to write posts that resonate.
Also, take time to read other blogs you admire. See what they do well, and think about how you can approach similar topics with your own voice or perspective. You don’t need to reinvent the wheel — just be authentic, consistent, and offer something uniquely you.
Understanding your readers is one of the best foundations for anyone learning how to start a blog that truly connects.
How to start a blog Step 2: Choose a Name That Fits You
The second step to start a blog is finding the right name when you start a blog is one of the most exciting — yet challenging — steps. Your blog name will become part of your identity, your brand, and something people will remember (or not!). And once it’s everywhere — on your website, social media, and email — it won’t be so easy to change later.
Here are a few tips to help you pick the perfect one:
- Make it unique: Try to avoid overused words that show up everywhere in your niche. Whether it’s travel, food, or lifestyle, certain terms (like “nomadic,” “adventurous,” “wanderlust,” or “wellness”) have been used too many times. Go for something that truly reflects you and your message.
- Keep it short and memorable: Aim for a name that’s easy to spell and remember. Ideally, stick to three or four words maximum — something people can type without errors and recall easily.
- Think long-term: Choose a name that can grow with you. Avoid dates, time frames, or overly specific words that might limit you later. You might start writing about one topic now, but who knows how your blog will evolve?
- Check availability everywhere: Before you fall in love with a name, check if it’s available across platforms (you can use tools like Namecheckr). Also, go for a .com domain if possible — it’s still the most trusted and recognizable.
When we brainstormed names, we made a list of several options and checked their availability on social media and domains. Eventually, we settled on The Daily Packers:
- The Daily — because we wanted it to feel like a journal of stories and experiences shared regularly.
- Packers — inspired by backpackers, since we were often traveling or hiking with backpacks.
Looking back, it fits us perfectly — even if our lifestyle has evolved since. The key is to pick a name that feels personal, authentic, and something you’ll still be proud of years down the line.
Your blog’s name is the first step in making your vision real — so take your time and make it count.
How to start a blog Step 3: Set Up Your Domain and Hosting
Introduction
If you’re new to blogging and not from an IT background (like us), this part might sound a bit technical at first — but don’t worry, it’s easier than it looks. To start a blog, you’ll need two essential things: a domain name and a hosting provider.
- Domain: Your domain is your website’s address — it’s what people type into their browser to find your blog. For example, ours is thedailypackers.com. Think of it like your home address on the internet. You’ll need to purchase your domain name (usually yearly) from a domain registrar such as Namecheap, Google Domains, or directly through your hosting company.
- Hosting: Hosting is where your website actually lives. It’s the online “space” that stores your blog, its files, images, and all your content. When someone visits your website, your host’s server delivers that data to their browser. There are many hosting providers, but some of the most beginner-friendly ones are SiteGround, Bluehost, and Hostinger. They’re affordable, reliable, and have easy WordPress installation options — which is perfect if you’re just learning how to start a blog.
Your domain is like your street address, and your hosting is your house. Without one or the other, your visitors wouldn’t know where to find you or what to see once they arrive.
Choose your hosting
The creation and purchase of your domain can usually be done directly through the hosting company you choose — it’s much easier to manage everything in one place.
We’ve tested several hosting companies over the years, from entry-level providers to more advanced ones, and our favorite by far is the one we’re currently using and the one we recommend to start a blog is: SiteGround.
SiteGround has proven to be fast, reliable, and incredibly user-friendly, even if you’re just learning how to start a blog. Their customer support is top-notch (they’ve saved us more than once!), and their tools make it super easy to set up and maintain your site — from installing WordPress to managing backups and security.
When we first started our blog, we didn’t want to spend too much money, and SiteGround struck the perfect balance between affordability, performance, and quality service. It’s one of the best investments you can make when launching your own blog.
Once you’ve decided to start a blog, the next step is to choose the right hosting plan. Your hosting provider will store all your blog’s files, images, and data, so picking a reliable one is key for performance, speed, and security.
After trying multiple hosting companies, we now use SiteGround, and it’s the one we confidently recommend. They offer three main hosting plans that work for every level — from complete beginners to advanced users managing multiple sites. Here’s a quick breakdown to help you choose:
- StartUp: Perfect if you’re just getting started. It’s affordable, simple to set up, and ideal for a single blog, small business, or personal website. Despite being the entry plan, it’s fast and secure — great for your first project.
- GrowBig: This plan offers the best value for most bloggers who start a blog. It includes more resources, faster speed (thanks to SiteGround’s Ultrafast PHP), on-demand backups, and staging tools — which let you safely test updates before going live. Plus, you can host unlimited websites under one plan.
- GoGeek: Built for professionals, agencies, or high-traffic websites that need more power. It includes priority support, staging and GIT integration, and advanced tools tailored for heavy workloads.

Tip: If you’re new to blogging, start with the GrowBig plan — it gives you flexibility as your site grows without breaking the bank. Later, you can always upgrade when your blog starts attracting more traffic.
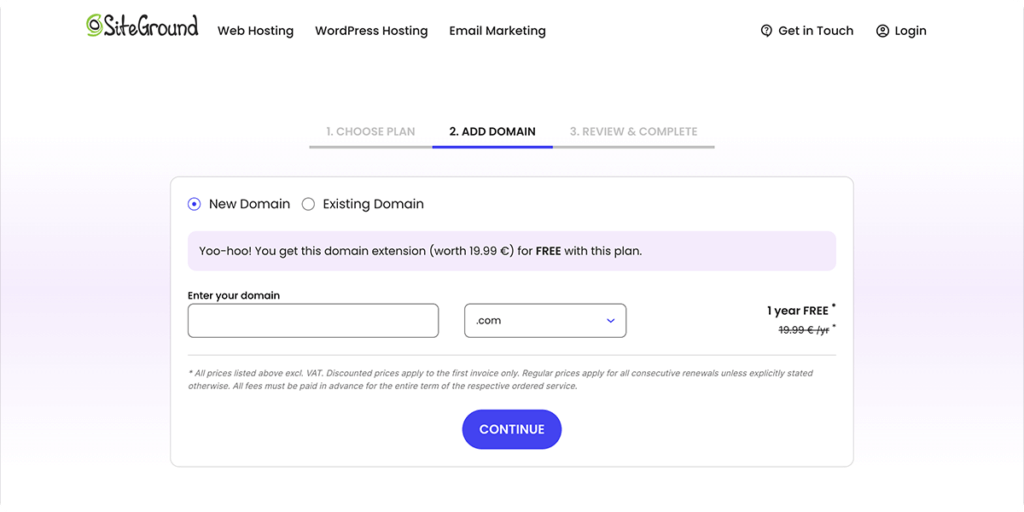
Choose a Domain Name
As you should already have picked your name ahead of this step, you can just enter your domain name. If you’re starting a blog fresh, you can easily register your domain directly through SiteGround while setting up your hosting. They often run special promotions, including a free top-level domain for the first year, which makes getting started even easier.
If you already own a domain, you can simply connect it to your new SiteGround hosting — the process is straightforward and well-explained during setup.
Complete the Order
Now that you’ve chosen your hosting plan and domain name, it’s time to complete your order and officially start a blog.
This step is super straightforward — you’ll review your selected plan and domain, enter your account details and payment information, and choose any optional add-ons. SiteGround’s checkout page is clean and easy to follow, even if this is your first time setting up a website.
Pro Tip: Some of the extra services offered during checkout often come at a discounted price, and this is the best time to grab them. For example:
- Domain Privacy — keeps your personal info hidden from public domain registries.
- Site Scanner — helps monitor your site for malware or security issues.
- Daily Backups — automatically save your blog’s content, giving you peace of mind.
Once you’ve filled everything in, click confirm — and that’s it! You’re now the proud owner of a domain and hosting account, ready to move on to start a blog.
Tip: Get the best prices with SITEGROUND right now
How to start a blog Step 4: Set Up WordPress
Basic parameters & Activation
Step 4 to start a blog is the basic setup. Once your hosting and domain are ready, it’s time to set up WordPress — the world’s most popular blogging platform and the perfect tool for beginners. It’s free, powerful, and gives you complete control over your blog’s design and functionality.
The best part? If you’re using SiteGround, WordPress can be installed automatically during setup. You’ll simply:
- Create your WordPress login credentials (username and password).
- Choose a theme — this is the basic design for your blog. Don’t overthink it right now; you can easily change it later.
- Activate your site and start exploring your WordPress dashboard.
WordPress is incredibly beginner-friendly. You can customize every part of your blog, add new pages or posts, and extend its functionality with plugins (we’ll talk about those soon).

Tip: We currently use the Kadence theme — it’s fast, flexible, and works great with both beginners and advanced users. But feel free to start with any free theme that matches your style; what matters most right now is getting your blog up and running!
Customize Your WordPress Setup
Once you’ve chosen your theme, click “Start Building” to begin setting up your WordPress site and start your blog. Don’t worry — this process is simple and only takes a few minutes.
- Set up your WordPress account: You’ll be asked to choose whether your website is for business or personal use. Go ahead and select Business — this gives you more flexibility later on.
- Add your site name and description: This is what will appear at the top of your site and in search engines. Don’t stress about getting it perfect right now — you’ll refine it later when optimizing for SEO.
- Choose a static homepage: This means visitors will first see your homepage rather than a list of your latest blog posts.
- When prompted, click “Not now” for both of the following screens: The one asking if you want to make your site public (you can do that later). The WooCommerce setup (it’s for online stores — not needed at this stage).
And there you go! You’ve officially entered your WordPress dashboard — the control center for your blog. From here, you can start a blog by designing your site, writing your first posts, and bringing your blog vision to life.
Tip: Invest where it matters most — your hosting, domain, and design. These are the foundations of your blog’s performance and reliability. Everything else can be added step by step as you develop your content and brand.
Connect to Your Blog
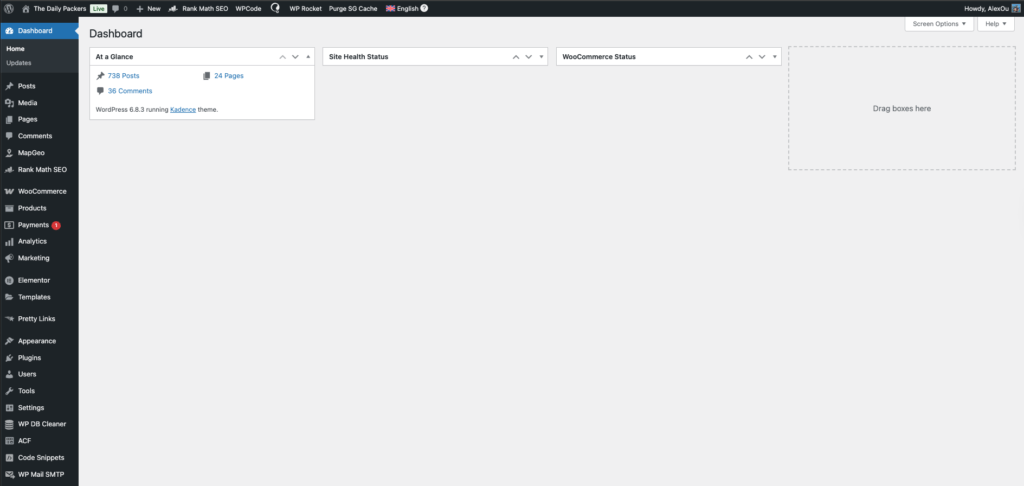
Now that your WordPress setup is complete, it’s time to log in to your site and explore your new dashboard! To access your WordPress admin area, simply open your browser and type: http://yourdomainname.com/wp-admin
You’ll see the WordPress login screen. Enter the username and password you created earlier during setup, and hit Log In.

On the left-hand side of your dashboard, you will see:
- Posts: where you write, draft, and publish your travel blog posts
- Pages: where you build static pages on your site.
- Comments: where you approve, spam, or reply to comments on your travel blog posts
- Appearance: where you change the look of your travel blog, install new themes, edit your menu…
- Plugins: where you install and update plugins
- Settings: where you can alter your site settings and users.
Adjust Your WordPress Settings
Before you start a blog by designing or writing, it’s important to fine-tune some key WordPress settings. These adjustments will make your blog easier to manage, improve user experience, and help with SEO.
Go to your WordPress Dashboard → Settings, and review the following sections:
Reading Settings: Head to Settings → Reading
- Set “Your homepage displays” to A static page.
- Under Homepage, select Home.
- Under Posts Page, choose –Select– (leave it blank).
- This will allow you to design your blog layout freely later, especially if you plan to use a page builder like Elementor.
Permalinks Settings: Go to Settings → Permalinks
- Under Common Settings, select Post name. This ensures that your URLs are clean and SEO-friendly. For example:
- thedailypackers.com/how-to-start-a-blog (recommended)
- instead of thedailypackers.com/?p=123 (not ideal)
Once you’ve made these changes, click Save Changes. These steps may seem small, but they will make a big difference in how your website performs and appears to both readers and search engines.
How to start a blog Step 5: Theme, Logo, and Plugins
Design and Set Up Your Theme
Now that your basic settings are in place, it’s time to make your blog look professional and reflect your style. This is where your theme comes in — it controls the overall design, layout, and visual identity of your site.
Choose a Theme: Go to Appearance → Themes → Add New. You’ll find thousands of free themes available in the WordPress directory. If you want more control and customization options, consider using a premium theme.
We personally use Kadence, a lightweight and flexible theme that works perfectly with page builders like Elementor or Gutenberg. It’s fast, user-friendly, and customizable without requiring coding skills. We recommend getting the Kadence Premium Theme if you are serious about blogging. This will give you much more freedom.
Customize Your Theme: Once your theme is installed, click Customize under Appearance to start editing:
- Add your logo and favicon (the small icon that appears in browser tabs).
- Choose your brand colors and typography to create a consistent look.
- Adjust your header, footer, and menu navigation.
- Set up your homepage layout and sidebar options.
Take time to explore the options and create a design that fits your personality and content. You can preview every change before publishing it, so don’t hesitate to experiment.
Once you’re satisfied, click Publish to make your design live. Your blog is now starting to look like a real website.
Create Your Logo and Design
Your logo is one of the first things people notice when visiting your blog, so it’s worth spending a little time creating something simple, clean, and memorable.
The easiest way to design a logo is by using Canva (or Canva Pro). It’s an intuitive online design platform with thousands of ready-to-use templates, fonts, and icons. You don’t need any design experience — just pick a template you like, customize the text, colors, and layout, and download it in PNG format with a transparent background.
We personally use Canva Pro for all our graphics, from our logo to blog post images. It’s much faster and simpler than complex software like Adobe Photoshop, especially for beginners.
Once your logo is ready, upload it to your website:
- Go to Appearance → Customize → Site Identity.
- Upload your logo and set a smaller version as your site icon (the little image that appears on browser tabs).
This step instantly gives your blog a professional identity and helps strengthen your brand presence across your site and social media platforms.

Choosing the Right Design Tool
Once your basic setup and logo are done, it’s time to design your website layout, an important part to start a blog — the part that makes your blog look professional, unique, and easy to navigate. Over the years, we’ve tried both Elementor Pro and Kadence Pro, and each has its strengths depending on what you want for your blog.
To design each section of your blog — pages, posts, layouts, or landing pages — install Kadence Blocks, a plugin that enhances the Gutenberg editor with additional blocks like advanced buttons, info boxes, testimonials, and galleries.
For more flexibility, Kadence Blocks Pro gives you dynamic content options, animations, custom icons, and global design control — letting you create stunning layouts without slowing down your site.
Why We Love Kadence and recommend it to start a blog
- Lightweight and performance-first (improves loading speed & SEO)
- Seamlessly integrates with Gutenberg
- No need for external page builders
- Flexible design options with Kadence Blocks Pro
- Perfect balance between power and simplicity
With Kadence, you can create your entire blog — from the homepage to article layouts — using only the Gutenberg editor. It’s fast, efficient, and the perfect solution if you want a professional blog that performs well without technical headaches.
As a first step, we would recommend starting a blog by building:
- Header – The upper part of your blog where the menu is located.
- Footer – The lower part of your blog with links and copyright.
- Post Template – Create a consistent design for all your blog articles.
- Global Widgets – Reuse elements (like buttons, banners, or CTAs) throughout your site.
Tip: Starting with the right tools will save you so much time.
Other Plugins to start a blog:
Free Plugins to start a blog
- Akismet Anti Spam: To protect your website against attack and spam.
- Rank Math: To improve your blog post and page and rank better in Search engines. Rank Math is the easiest one and much more efficient than Yoast, especially with Elementor.
- Smash Balloon Instagram Feed: To insert Instagram pictures
- WooCommerce: If you want to set up an online store
- EWW: Free and paid versions to improve your picture size.
How to start a blog Step 6: Create your pages, header, footer, and template
Now that your blog’s foundation is set, it’s time to design the main structure — the header, footer, and key pages that will appear throughout your website.
Header & Footer
Your header (top section) usually includes your logo and navigation menu, while the footer (bottom section) contains useful links like your About page, Contact info, and social media icons.
These two elements appear on every page, so take a bit of time to design them clearly and consistently. Most modern WordPress themes and page builders (like Kadence, Elementor, or others) include an easy drag-and-drop editor to create them.
Post Template
Your post template defines how your blog articles will look — where the title, content, and sidebars go, and how related posts or comments appear. Setting a default layout helps keep your blog consistent and professional.
Pop-ups & Cookies
Every website should display a cookie consent banner to comply with privacy laws (GDPR and CCPA). You can create a simple pop-up or notification bar with your theme or a dedicated plugin (we recommend using Complianz for that). Later, remember to add a Privacy Policy and Terms of Use page as well.
Core Pages
Start a blog with the essentials:
- Home – your main landing page
- Blog – where your posts appear
- About – who you are and why you blog
- Contact – how visitors can reach you
These pages will evolve, but they form the base of your site.
Navigation Menu
Once your pages are ready, create a simple menu linking them together. You’ll use this menu in your header and possibly footer too.
With this structure in place, your blog will finally look and feel like a real website — ready for your first articles.
Tip: Get Kadence Premium to make your blog stand out.
How to start a blog Step 7: Create Content & Track it
Create Articles (Posts)
Now that your pages and structure are ready, it’s time to bring your blog to life by writing your first posts. Head to Posts → Add New in your WordPress dashboard.
Before you start a blog by writing, fill in a few key details:
- Title: The main title of your article — make it clear and engaging.
- Category: Organize your posts by topic (e.g., Travel, Food, Lifestyle). This helps both readers and SEO.
- Status: Choose whether to publish immediately or schedule it for later. Consistency is great for SEO, but focus on writing first — the schedule can come later.
- Tags: You can skip them for now — they don’t add much SEO value anymore.
- Featured Image: The main photo for your post. It will appear on your homepage, blog feed, and in Google results.
- Excerpt: A short preview of your article. Keep it between 100–160 characters to summarize what the post is about.
Once those are set, you can open your post in your preferred editor — WordPress Block Editor, Kadence Blocks, or Elementor — and start a blog bycreating your content.

Tip: Once you’ve written a few posts, create a Post Template that includes your favorite layout (featured image, introduction block, “related posts,” and footer). You can then reuse it every time you publish a new article — it will save you tons of time and help keep your blog consistent.
Optimize Your Blog for SEO
Once you’ve written your first articles, it’s time to make sure people can actually find them. That’s where SEO (Search Engine Optimization) comes in. This is an important step in starting a blog.
If you’re using Rank Math, it’s very easy to see how well each post is optimized. Simply look at the SEO score section on the top-right (or left, depending on your layout) of your WordPress editor. Rank Math will give you clear, actionable tips to improve your content — from keyword placement to meta descriptions and image optimization.
Try to get your SEO score as high as possible before hitting publish. Aim for a “green” rating — but don’t stress about perfection. The key is learning as you go.
Tip: We recommend using Mangools, a powerful SEO toolset that helps you track your keywords, analyze competitors, and identify SEO opportunities for your blog. It’s an excellent companion to Rank Math — Rank Math helps you optimize your pages, while Mangools helps you choose and track the right keywords for long-term growth.
With both tools, you’ll have everything you need to monitor your SEO performance and grow your blog’s visibility over time.
How to start a blog Step 8: Get connected to the World
Now that your blog is live, it’s time to share it with the world! Promoting your content through social media is one of the most effective ways to grow your audience and attract readers to your website.
Start a blog by creating accounts across major platforms using the same name as your blog. Even if you don’t plan to use all of them immediately, securing your blog’s name early ensures brand consistency and prevents someone else from taking it.
Here are the main social platforms we recommend:
- Facebook Page – Great for sharing articles, building a community, and connecting with readers.
- Instagram – Perfect for visual storytelling, behind-the-scenes posts, and short updates.
- Pinterest – One of the best traffic sources for blogs. Create and share pins linking to your articles to drive long-term visitors.
- YouTube – Ideal if you enjoy creating video content or tutorials related to your niche.
Tip: While we’re still growing our audience, Pinterest has proven to be the most effective for bringing consistent traffic to our blog. Start focusing on one or two platforms that match your content style, and expand later once you find your rhythm.
The goal is to connect, share, and slowly build a community around your blog.
How to start a blog Step 9: Write High-Quality Content
Now that your blog is live, it’s time to fill it with great content. This is what will make people come back — and what Google will love most. Write articles that actually help your readers. Whether you’re sharing experiences, teaching something new, or reviewing products, always focus on value.
Start a blog with topics that answer your audience’s questions. Do a bit of keyword research using tools like Mangools, Google Keyword Planner, or even Pinterest search to see what people are looking for.
Plan at least 5 to 10 blog posts before officially promoting your site. That way, new visitors have enough content to explore — and it instantly makes your blog feel more complete.
Don’t worry about perfection. Focus on being helpful, honest, and consistent. The more you write, the better you’ll get.
How to start a blog Step 10: Build an Email List
If there’s one thing every blogger wishes they’d done earlier, it’s this. Start a blog by collecting emails from day one. Your email list is the only audience you truly own — social media platforms can change their rules or algorithms overnight, but your subscribers are yours to keep.
Use tools like MailerLite, ConvertKit, or Flodesk to create a simple signup form. Offer a freebie if you can — something small but useful like a checklist, mini guide, or printable related to your niche.
Even if you only send one newsletter a month, it keeps your readers connected and helps you build trust over time.
Tip: Get Kadence Premium to make your blog stand out.
How to start a blog Step 11: Track Your Progress
Once your blog is running, you’ll want to see how it’s performing. Set up Google Analytics 4 and Google Search Console — both are free and easy to install. They’ll show you where your visitors come from, which articles get the most views, and which keywords people use to find your site.
For keyword tracking and SEO insights, we recommend Mangools again. It’s beginner-friendly and shows you exactly what’s working (and what needs tweaking).
Check your analytics once or twice a month. Don’t obsess daily — focus on creating content, not just watching numbers.
How to start a blog Step 12: Monetize Your Blog
Once you’ve built up a bit of traffic and trust, you can start thinking about earning money from your blog. Here are a few of the main ways bloggers monetize:
- Affiliate Marketing: Recommend products you use and love — earn a small commission when readers buy through your links.
- Display Ads: Once you have consistent traffic, you can add ads through networks like Google AdSense or Mediavine.
- Digital Products: Sell printables, courses, or eBooks.
- Sponsorships: Work with brands that fit your blog’s niche.
Focus on building trust before monetizing. Readers can tell when something is genuine — or not. Promote only what you’d personally use.
How to start a blog Step 13: Keep Learning
Starting a blog is just the beginning. The more you learn, the better your blog will become. There’s no end to what you can improve — from SEO and writing to Pinterest strategy and affiliate marketing.
Be patient. Success doesn’t happen overnight. Keep showing up, stay consistent, and keep learning new things.
Blogging is like any creative journey — you get better with time. Don’t compare your first month to someone else’s fifth year. Just keep going.
Tip: Get Kadence Premium to make your blog stand out.
How Much Does It Cost to Start a Blog?
If you’ve followed our setup so far, you’ll see that starting a blog doesn’t need to cost a fortune. Here’s a breakdown of what you can expect to pay per year:
- SiteGround Hosting: around $48/year (depending on your plan and promotions)
- Domain Name: about $20/year
- Canva Pro: $125/year (optional, but great for creating visuals, logos, and pins)
- Kadence Pro: $144/year
That means your core blogging costs are roughly $212/year, or $17.7 per month. If you want to keep it even more affordable, you can start with free tools like Canva Free and the WordPress Block Editor, then upgrade later as your blog grows.


Thanks for sharing this! Very well-written and genuinely informative.
Thank you very much. Glad if it can be of use :D