
Why You’ll Love Hiking Laguna de Los Tres
If you are planning a trip to Argentina or exploring South America, you’ve likely seen photos of the jagged, granite peaks of Mount Fitz Roy in Patagonia. There is no better way to see it up close than the Laguna de Los Tres hike.
While you can see the mountain from the streets of El Chaltén, nothing compares to standing at the edge of a turquoise glacial lake with the massive towers of rock looming right in front of you.
You’ll love this trail because it offers a bit of everything: ancient forests, wooden boardwalks over marshes, and some of the most dramatic mountain scenery we have ever seen on the planet. It’s a challenging day, but the payoff at the Mirador del Fitz Roy is legendary.
We’ve hiked in many places, from the Tour du Mont Blanc to Aconcagua Provincial Park, but the raw beauty here is truly in a league of its own.
This guide covers everything you need to know to tackle the most famous trek in the region. We’ll help you choose the best path, manage your timing, and make sure you’re prepared for the unpredictable Patagonian weather.

Choosing Your Trail
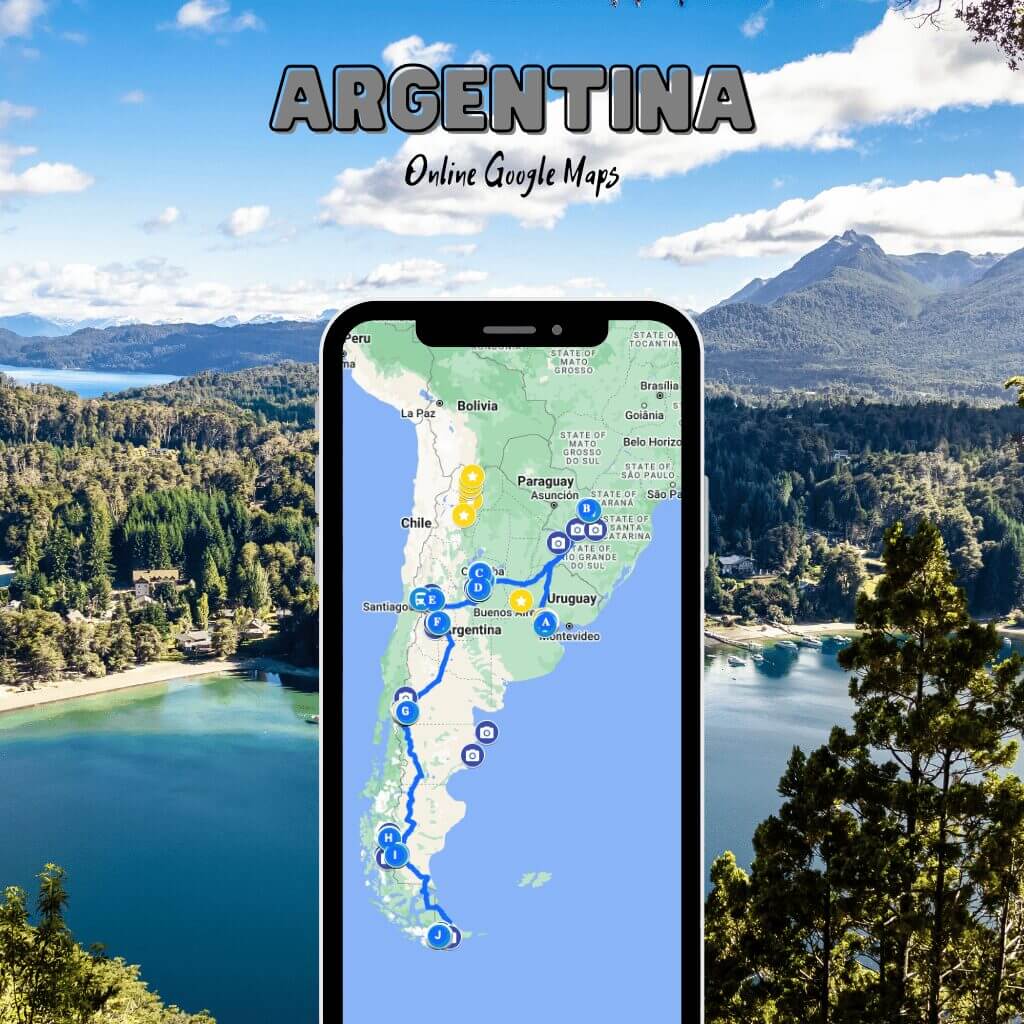
There are three main ways to tackle the Laguna de Los Tres hike, and the one you choose will completely change your experience. All of them lead to that incredible view of Mount Fitz Roy, but the effort and scenery vary quite a bit.
Option 1: The Classic Route (Out and Back)
This is the most direct path. You start right at the end of San Martín street in El Chaltén and follow the trail all the way up and back. It’s free, very easy to follow, and you will pass directly by the Mirador del Fitz Roy. The downside? You’ll be seeing the exact same scenery twice, and the initial climb right out of town is a bit of a leg-burner before it levels out.

Option 2: The El Pilar Route (The “Loop” Experience)
This is the route we chose, and we can’t recommend it enough. Instead of starting in town, you take a shuttle to the El Pilar trailhead, about 17km away. From there, you hike “into” the mountains toward the lagoon, and finish by walking back down into El Chaltén. We loved this because you get to see the Piedras Blancas Glacier in the morning, which you’d miss on the classic route, and the landscapes are constantly changing.
Option 3: The “Big Loop” (Combined with Laguna Torre)
If you are fit and have a very long day of sunlight or want to stay overnight at Campamento Poincenot, you can actually connect this hike with the trail to Laguna Torre. After coming down from the Fitz Roy viewpoint, instead of heading all the way back to town, you take a connecting trail (usually via Lagunas Madre and Hija). It’s a massive day, often over 30km, but it’s the ultimate way to see the two most famous lakes in the park in one go.
We have included all 3 options in our Argentina Google Map!
How to Hike Laguna de Los Tres
Since we decided to take the El Pilar route, we’ll walk you through that specific experience. It’s a bit of a longer day in terms of distance, but it’s far more scenic and feels like a true expedition into the heart of the park.
Step 1: The Shuttle to El Pilar
The easiest way to get started is by arranging a transfer through your hostel or hotel in town. Most places in El Chaltén can organize a shuttle service for you, but make sure to book it at least a day in advance to secure your spot. Usually, you’ll have a choice between an early 8:00 AM departure or a slightly later 9:30 AM one.

We hopped in a van right from our hostel door. The drive takes you about 30 minutes north of town along a bumpy, unpaved dirt road. It’s a bit of a “Patagonian massage” with all the jolts, but looking out the window at the valley as you approach the mountains is the best way to wake up.

Step 2: El Pilar to Glaciar Piedras Blancas
The trail begins in a beautiful, dense forest. This first section is a moderate trek that takes roughly 3.5 to 4 hours. What we loved most here is that the path is relatively flat and well-marked, allowing you to actually look around at the ancient trees and listen to the birds rather than just staring at your feet.

The absolute “wow” moment of this section is the viewpoint for Glaciar Piedras Blancas. It’s a stunning hanging glacier that looks like it’s frozen in mid-air as it spills down the mountainside into a bright turquoise lagoon. In the early morning, this area is incredibly peaceful. We encountered very few people here, just a couple of guided groups, which made the landscape feel even more vast and wild.
Step 3: Joining the Main Trail at Camping Poincenot
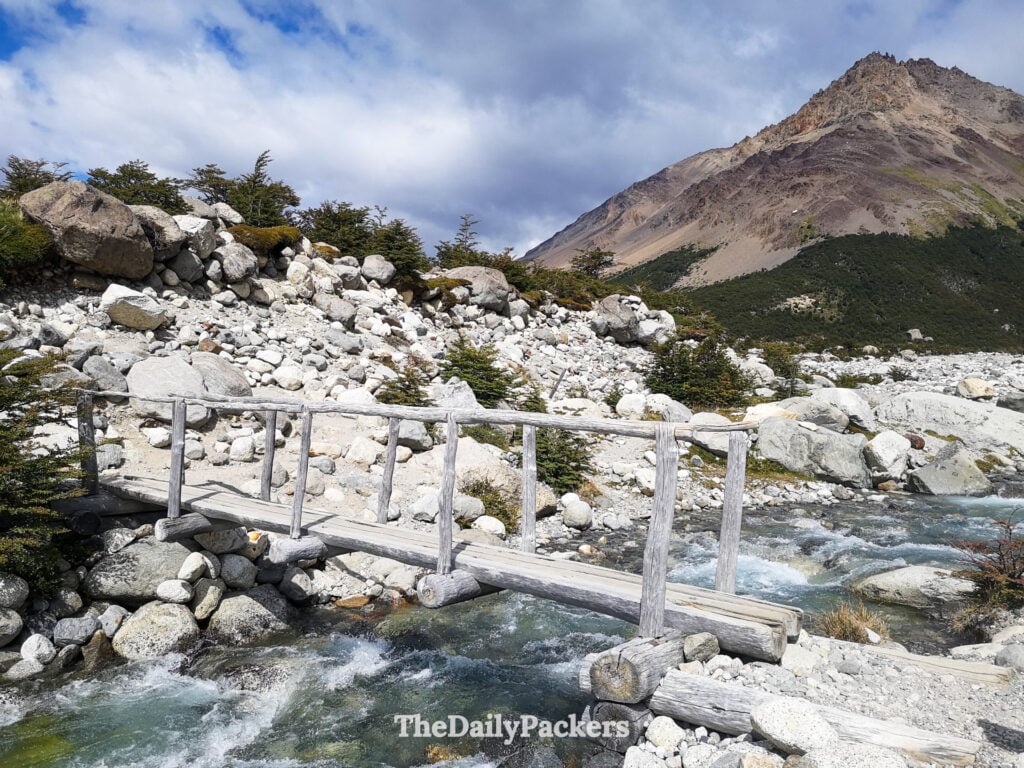
Eventually, the forest opens up, and you’ll reach the Poincenot camping area. This is where your path merges with the classic Fitz Roy hike trail coming from El Chaltén. From here, you’ll continue toward Río Blanco. This stretch is easy and flat, crossing a few wooden boardwalks over marshy ground.

You’ll pass a small shelter at Río Blanco, which used to be a ranger checkpoint. There are some basic toilets here, but honestly, we’d recommend sticking to “nature” if you can, as they aren’t the best maintained!
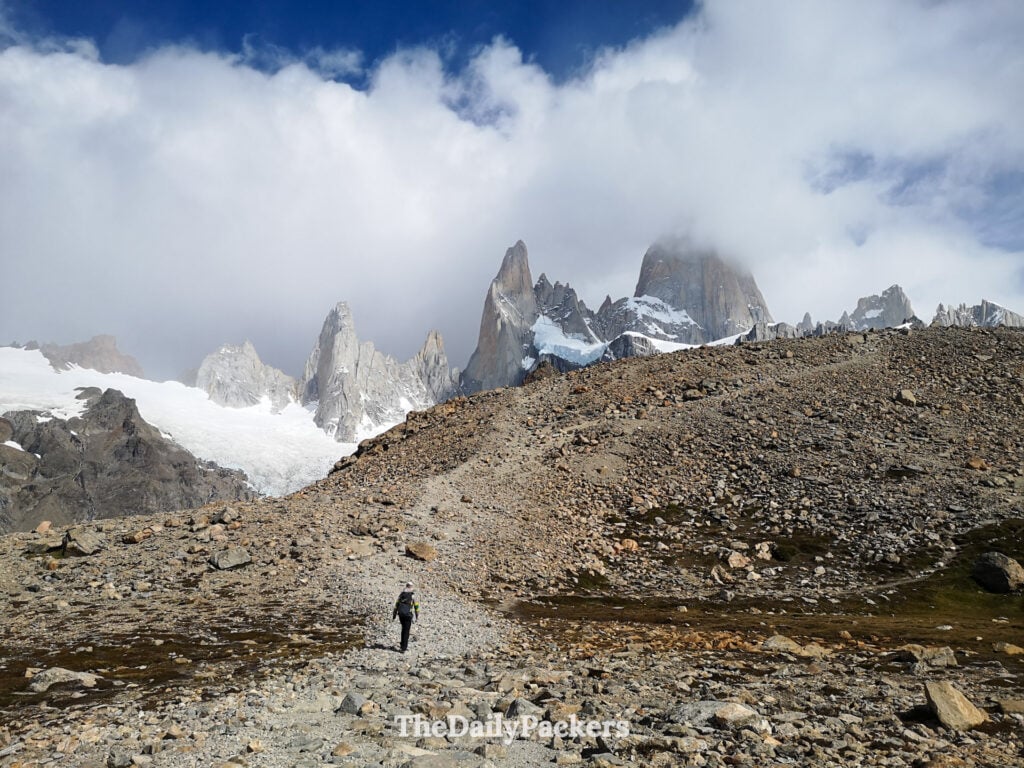
Step 4: The Final Ascent
This is the part everyone talks about. From Río Blanco, you face a steep 400-meter climb over a distance of just 1 kilometer. It’s a relentless, rocky zigzag path. You’ll see plenty of people stopping to catch their breath (we certainly did!), but don’t rush. As you climb higher, the views behind you of the valley and the lakes start to open up, giving you a great excuse to “stop for a photo” while you actually just catch your breath.

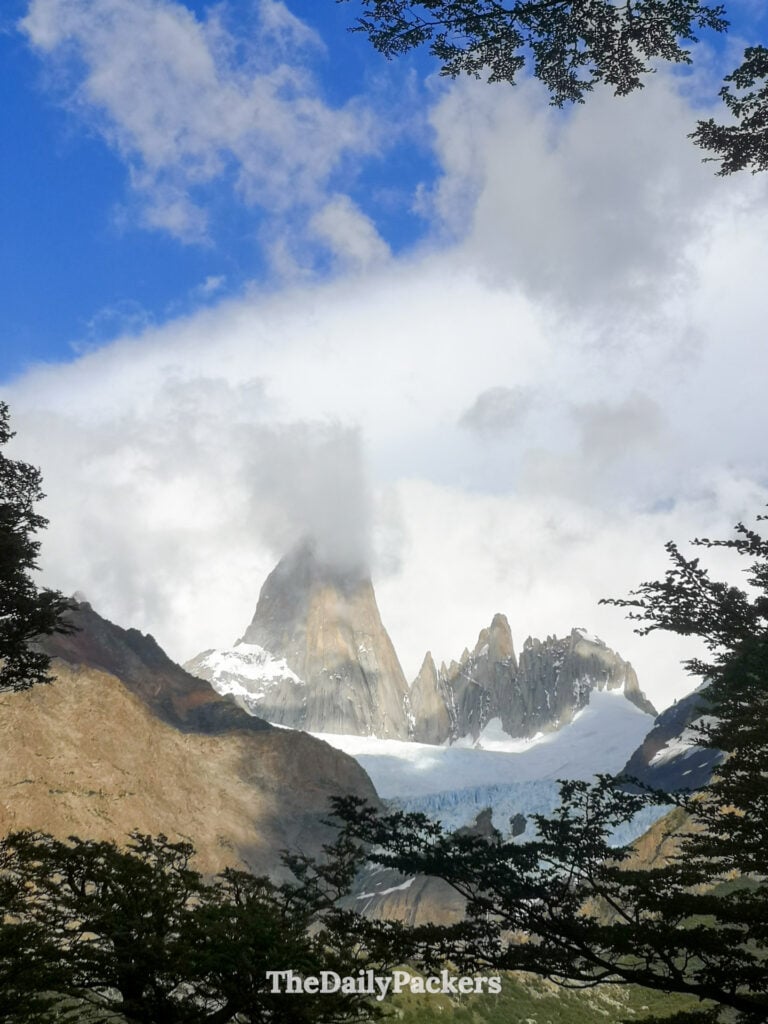
It’s a tough push, but the moment you crest that final ridge and the Laguna de los Tres appears with the massive granite spires behind it, the struggle is instantly forgotten.

Reaching Laguna de Los Tres
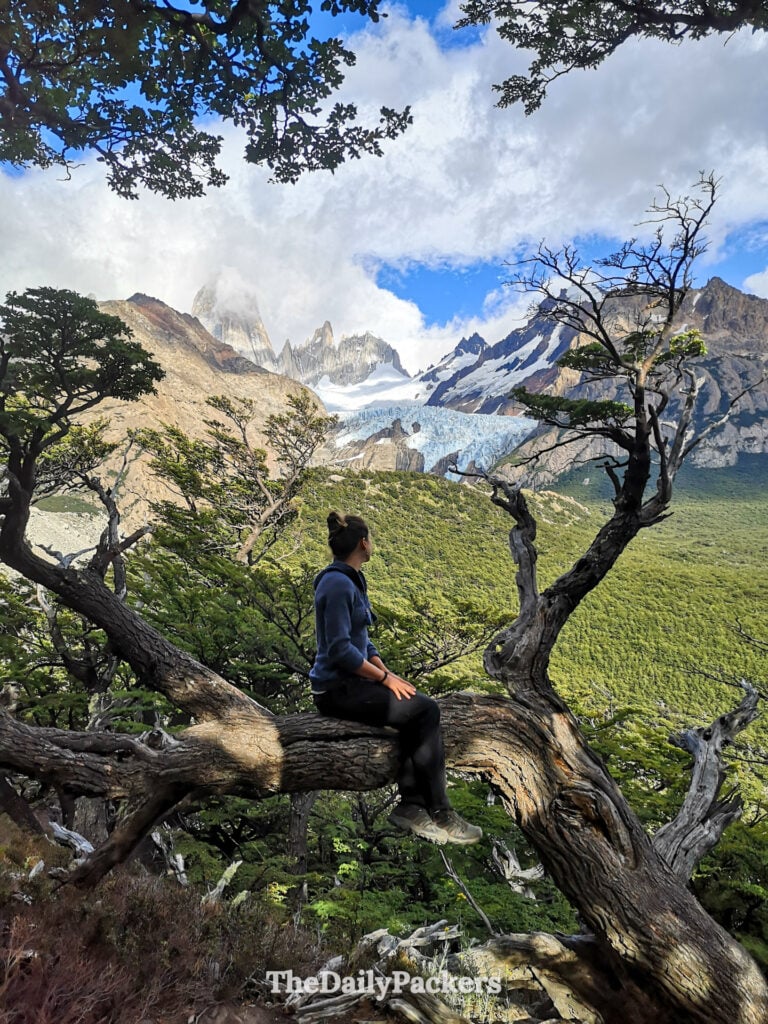
When you finally crest that last rocky ridge, the view of Laguna de los Tres hits you all at once. It is absolutely breathtaking. Even if you arrive on a day like the one we did, where the sky is a bit moody and cloudy, the landscape remains spectacular. There’s something mystical about seeing the clouds drift over the jagged granite peaks of Mount Fitz Roy.

Be warned: it gets incredibly windy at the top! We had to scout around for a while to find a somewhat sheltered spot behind some rocks to sit down. This is the moment to pull out that lunch box you packed. There’s nothing quite like eating a sandwich while staring at one of the most famous views in South America.

We stayed for a good 40 minutes, just soaking in the scale of the towers and the deep blue of the glacial water before the cold wind convinced us it was time to move.

The Descent and Mirador del Fitz Roy
After a while at the Laguna de Los Tres, we began the trek back down. The first part is the same steep, rocky path you climbed up, so watch your knees! On the way down, we really noticed the difference in crowds. Since we started early at El Pilar, we had the morning to ourselves, but now the trail was getting much busier with hikers coming up from town.

Once you get back down to the valley floor, instead of heading back toward El Pilar, you’ll follow the signs for the “Classic” route to El Chaltén. This path takes you past the Mirador del Fitz Roy. This is a must-stop. It’s a slightly more distant perspective than the lagoon, but it allows you to see the entire mountain range in one frame. It’s the perfect spot for those “postcard” photos.

The rest of the hike back is a pleasant, winding walk through open valleys and forests. It’s mostly downhill or flat, so you can really enjoy the scenery. We finally made it back into town by late afternoon, and wouldn’t you know it, the clouds completely cleared, and Fitz Roy appeared in all its glory! We didn’t mind, though; seeing it under that moody morning sky felt like a secret experience only we had.

How to Get to the Trailhead
Getting to the trails of Laguna de los Tres is actually very simple, as you don’t even need to leave the town of El Chaltén for most of them. The town itself is located inside Los Glaciares National Park, so the “park entrance” is essentially the edge of the village.
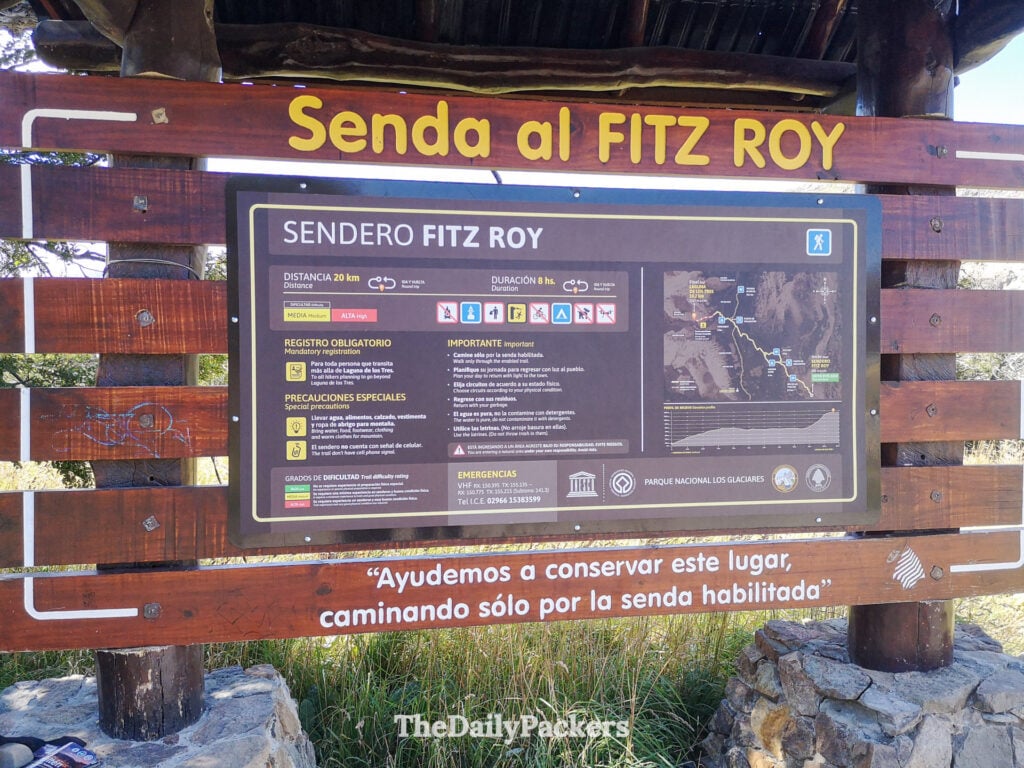
If you are doing the classic out-and-back hike, you just walk to the northern end of San Martín Street. You’ll see a large wooden sign marking the start of the Fitz Roy trail. There is no entrance fee for this part of the park, which is a huge plus!
For those following our lead and taking the El Pilar route to Laguna de los Tres, your journey starts with a 30-minute shuttle ride. You can arrange this through almost any reception desk in town.
In the high season, there are 3 daily departures at 8:00 am, 9:30 am, and 12.00 pm. They will pick you up directly from your accommodation and drop you off at the El Pilar trailhead. From there, you hike “back” towards town. It’s a very smooth system that saves you from having to worry about parking or navigating.

The Best Time to Visit: Weather & Seasons
Patagonia is famous for having “four seasons in one day,” and El Chaltén is the heart of that chaos. If you want the best chance of clear views of the peaks for your Fitz Roy hike, timing is everything.
In the Spring, which runs from September to November, the flowers start to bloom, and the landscapes wake up. It’s still quite chilly, with temperatures ranging from 3°C to 14°C (37°F to 57°F). It tends to be windier than usual during these months, but the upside is that the trails are much quieter than in the peak of summer.
Summer arrives between December and February, and this is the busiest time for a reason. The days are incredibly long, giving you plenty of light for long treks. Temperatures usually sit between 7°C to 18°C (45°F to 64°F). You should expect plenty of other hikers at the Mirador del Fitz Roy, and you’ll definitely need to book your stay in advance.
Autumn, from March to May, is actually the best time to be there. The lenga forests turn bright orange and red, making the whole area look like a painting. It’s a bit cooler, between 2°C to 13°C (36°F to 55°F), but the wind often dies down, and the colors are unbeatable for photography.
Winter, from June to August, is a completely different world and only for the very experienced. Many hotels and restaurants in town actually close down. Temperatures drop to between -4°C and 5°C (25°F to 41°F), and most trails are covered in snow. It’s silent and beautiful, but you’ll likely need crampons or even a guide to navigate safely.
Our main recommendation is to always check the “Windguru” or “YR.no” apps the night before you head out. If the wind is predicted to be over 50km/h, reaching the Laguna de los Tres can be quite dangerous and, honestly, not very fun!

Psst, you can join Tina’s Yoga Studio and get access to hundreds of Yoga, Meditation, and Well-being videos.
Where to Base Yourself: Our Favorite Neighborhoods
El Chaltén is a very small town, so the “neighborhood” you choose isn’t about distance; everything is walkable, but more about the vibe you want after a long day on the trails.
The North End is perfect if you want to be as close to the trailheads as possible. If you stay here, you can literally walk out of your front door and onto the path to Mount Fitz Roy. It’s a bit quieter and feels a bit more “mountainous.”
The Main Strip (San Martín Street) is where all the action is. If you like being steps away from the best breweries and restaurants after your hike, this is the place to be. It can be a little noisier, but the convenience of having a hot meal and a craft beer right there is hard to beat.
We stayed at Rancho Grande Hostel, which had a great social vibe and was perfect for meeting other hikers. If you’re looking for something a bit more private, Aparts La Farfalla is a lovely mid-range option. For those who want to treat themselves after a long trek, Hosteria El Puma is incredible; most probably the best hotel in El Chalten.

Essential Hiking Gear & Tips
Patagonia is famous for its unpredictable weather, and the Laguna de los Tres trail is no exception. You can start your hike in bright sunshine and find yourself in a snowstorm or facing 100km/h winds just a few hours later. The secret to a successful day is being prepared for everything.
The “Three-Layer” Rule
The best way to manage the constant temperature shifts is by dressing in layers.
- Base Layer: Start with a moisture-wicking synthetic or merino wool shirt (avoid cotton, as it stays wet and makes you cold).
- Insulating Layer: A warm fleece or a packable down jacket is essential for when you stop at the lagoon or the wind picks up.
- Outer Shell: A high-quality, waterproof, and windproof jacket is non-negotiable. Look for one with a hood and, ideally, “pit vents” to help you breathe during that steep final climb.

Footwear & Support
- Hiking Boots: You need sturdy, waterproof boots with good ankle support or good hikies shoes. The final section of the trail is rocky, uneven, and can be very slippery if it has rained or snowed. Make sure your boots are well broken-in before you arrive!
- Trekking Poles: While not mandatory, they are a nice addition, especially for the steep 400-meter descent. They save your knees and provide much-needed stability on the loose rocks (scree) near the summit.

What’s in Our Backpack? For a day hike to Laguna de los Tres, a 20–30 liter backpack is the perfect size. Don’t forget:
- Water: Carry at least 2 liters. While the glacial streams are generally safe to drink from, we use a BeFree water filter just to be safe.
- Sun Protection: The Patagonian sun is incredibly strong, even on cloudy days. Bring high-SPF sunscreen, sunglasses, and a sun hat.
- Wind Protection: A warm beanie (wool hat) and lightweight gloves are essential for the summit, where temperatures drop significantly.
- Power & Navigation: Cold weather drains batteries fast, so bring a portable power bank. We also recommend downloading offline maps (like Maps.me or AllTrails) since cell service is nonexistent on the trails.

Tip: If you find you’ve forgotten something, don’t panic! El Chaltén has several excellent outdoor shops where you can rent everything from boots and poles to high-end jackets.
What No One Tells You
While the maps and signs give you the distances, there are a few things about the Laguna de Los Tres hike that you only really learn once you’re on the trail.
First, let’s talk about the timing to hike Laguna de los Tres. If you take the El Pilar route like we did, here is a realistic look at how your day might flow:
- 8:38 AM: We officially hit the trail at El Pilar.
- 10:30 AM: Reached Camping Poincenot (a great spot for a quick snack).
- 10:45 AM: Arrived at Río Blanco, the base of the “big climb.”
- 11:50 AM: Reached the summit at Laguna de los Tres.
- 1:15 PM: Back down at Río Blanco after enjoying the view.
- 3:50 PM: Finally stepped off the trail back in El Chaltén.
Keep in mind, we had another 2km walk across town to reach our hostel, finally sitting down at 4:15 PM. It is a long day!

Something else people often overlook is the “False Peak” before Laguna de los Tres. When you are struggling up that final kilometer, you’ll see a ridge and think, “I’m almost there!” Only to reach it and realize you have another 15 minutes of climbing. Don’t let it discourage you; the reward is just around the corner.
Also, the wind at Laguna de los Tres isn’t just a breeze; it can be violent. We saw people’s hats flying directly into the lake. Even if it feels warm in the valley, that final section is exposed, and the temperature drops instantly.
Lastly, the “toilets” at Río Blanco are… an experience. There is a small closed shelter there now, but the makeshift toilets are pretty rough. Most hikers agree that finding a quiet spot in the woods (away from water sources, of course!) is a much better option.

What it Costs: Budgeting for Your Day
One of the best things about hiking in El Chaltén is that the Laguna de los Tres hike itself is completely free. There are no national park entrance fees to pay at the trailhead, which is quite rare for such a world-class destination!
However, there are a few costs to keep in mind if you want to do it right:
- The Shuttle: If you choose the El Pilar route, expect to pay for the transfer. Prices fluctuate in Argentina, but it’s a small investment for a much better route. As of 2026, it costs 7,5 USD per person.
- Food: There are no shops or cafes on the trail. You’ll need to pack a full lunch and plenty of snacks. Most people either visit the local supermarkets the night before or ask their hotel to prepare a lunch box for them.
- Gear: If you don’t have your own trekking poles or a sturdy rain jacket, you can rent them in town for a few dollars a day. It’s worth every cent for the stability they provide on the descent.
Basically, if you pack your own food and walk from town, your only “cost” is the physical effort. If you want a bit more comfort (shuttle and rental gear), a small budget will go a long way.


About the authors
We are Alex and Tina, a French-Serbian couple who met in China back in 2014. We spent three incredible years there before making France our home. Our shared passion for travel has been the heartbeat of our relationship for over 12 years, taking us across 44 countries and counting.
We launched TheDailyPackers in 2019 as a way to document our adventures. In 2026, we reached a major milestone by officially turning our blog into our full-time job. While we are still growing toward financial independence through this platform, every article we write is fueled by our mission to make your voyages easier through in-depth guides, honest advice, and the lessons we’ve learned from our own mistakes.
Our journey has not been without its storms. In 2023, our world changed forever when our first son, Poppy, was stillborn on November 25th. It was, and remains, the hardest chapter of our lives. In 2025, we were blessed with our second little boy, Milo. He has since joined our traveling tribe, and you’ll be seeing him—and the reality of traveling with a little one-on the blog more and more.
We hope to inspire you to explore the world with curiosity and resilience. Thank you for being part of our story.
You may also like those related posts
11 best things to do in Capilla del Monte, Argentina, in 3 days
Morocco Itinerary: The Unforgettable 2-week Road Trip
Best Lavender Fields in Provence in 2025, France
Hiking in Tierra del Fuego National Park: The Ultimate Guide
How to Eat Healthier and Change your Diet in 4 easy steps
7 best things to do in Shangri-La, China, in 3 days or more
12 best things to do in Curitiba, Brazil, in 1 to 2 days
12 Most beautiful beaches in Corsica, France
Pssst, did you know that…
If you purchase something through our links, we earn a small fee. However, you still pay the same. Win-win! And one day we may get to be full-time travel bloggers =)
Find Hotels with Booking.com
Do Yoga with KVY
Buy us a Coffee
Rent a car with DiscoverCars
Find Attractions with GetYourGuide
Find Flights with Expedia
Buy an eSIM with Airalo
Get insured with World Nomads
Get ready with Amazon.com